
For each station in IPMV, you can enable multiple alarms.
Alarms are made of two interconnected elements: Conditions and Outputs. To trigger alarm, you must create Condition within the station and connect it with the Output. Multiple Conditions can be connected with the single Output, and a single Condition can be connected with multiple Outputs. For alarms displayed on screen Outputs are not used, Tags are used.
To add a new alarm:
First, select a station(s) to configure alarms for. You can select one or multiple stations.
Switch to “Alarms Conditions” tab to configure Alarms.
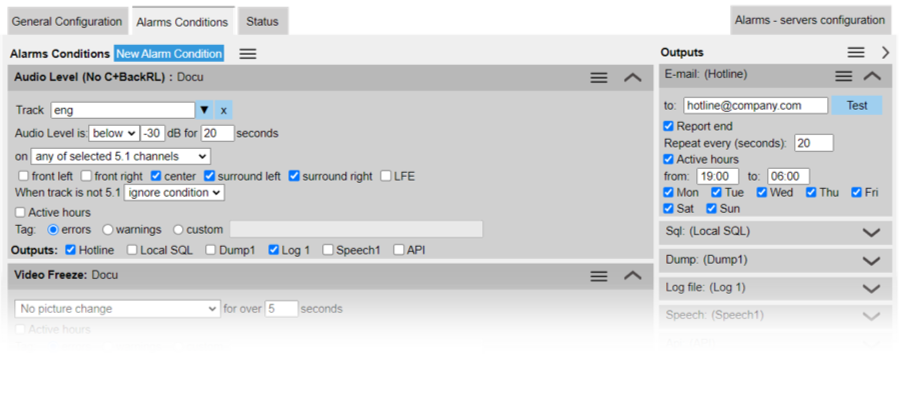
Alarms tab has two sections: Conditions and Outputs.
Conditions
To add a new condition:
Click button, then select what will be monitored.
- Signals: comprehensive monitoring of input parameters – including stream structure, data loss and audio/video decoding. Details here
- Audio level: audio above/below given parameters
- Track: type in which audio track(s) you want to monitor for audio levels. You can enter multiple values separated by a comma. For example: eng,deu,pid:200
Possible options:- DVB language code, i.e. eng, pol, deu.
- PID decimal, i.e.: pid:200
- PID hexadecimal, i.e.: pid:0×7f
To check and select audio tracks, click to see the list of audio streams for that program. Click to reset selection.
Language codes and PIDs are also listed under audio meters on video outputs.
- Audio level is below/above ____ dB for ___ seconds: alarm will be triggered when the audio is above or below the specified level for the requested number of seconds. Sound level can be measured on selected audio channels from stereo or surround signal, or weighted – all available channels mixed and measured according to EBU R128 standard.
- Track: type in which audio track(s) you want to monitor for audio levels. You can enter multiple values separated by a comma. For example: eng,deu,pid:200
- Video freeze: alarm is triggered when no picture change is found for specified number of seconds. It has tree modes of operation:
- regular: small screen changes (like change in a small logo) will still be considered “freeze”
- strict: no pixels can change
- strict, solid color: no pixels can change, whole screen must be in single color (black, blue, green etc.) - Missing subtitles: alarm will be triggered when specified subtitles track is not giving any output for configured number of seconds. To configure, enter subtitle track language code or PID and duration (seconds). To check and select language code or PID, click to see the list of DVB Subtitle streams. Click to reset selection.
Language codes are also displayed next to the subtitles on video output, when “show labels” option is enabled.
- Missing SCTE35: alarm will be triggered when no SCTE35 data is received for configured number of seconds. Select if “Null Commands” should be ignored.
- PID throughput: alarm will be triggered if traffic on selected PID over configured amount of time is above/below configured values
Active hours: when not checked, condition will be always active. Check if you want it to only run during a specific part of the day – select a day of the week and time range.
Tag: Condition can be qualified as error, warning, or you can select a custom label/tag for it. You can use these tags for customizing outputs on the screen.
Outputs: select outputs to trigger when the condition is met.
When done, you can minimize/collapse the view with an “arrow” icon on top of the form, to make space on the screen for another condition
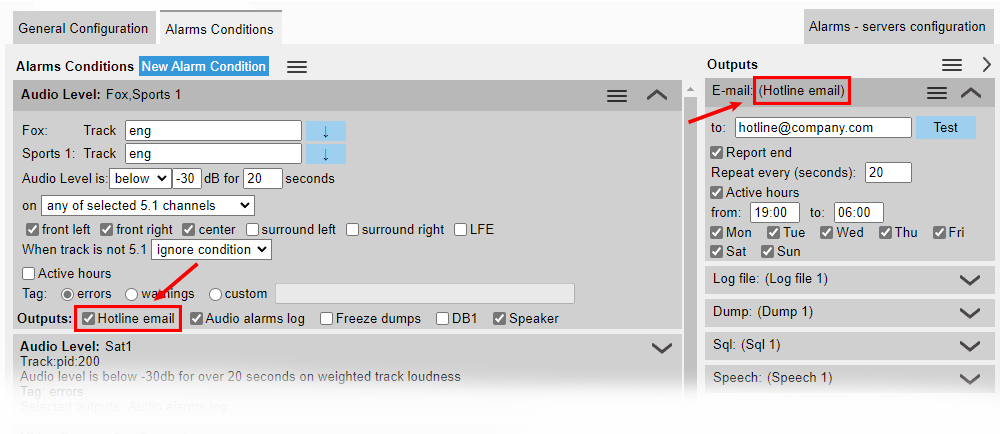
 Sample IPMV alarms configuration
Outputs
For each condition you can add multiple outputs. To create output:
- expand one of templates visible on the screen. If it’s already used, click “hamburger” icon and select New Alarm Output
- E-mail: will send e-mails. Enter recipients, separate multiple addresses with comma.
- SNMP: will send SNMP traps on alarms. For “SNMP – Machine ID” enter your IP Multiviewer machine number – should be unique within your IPMV systems. The number will be included in SNMP traps and the MID file will be generated for that configuration.
- Log file: will save all alarms to daily text logs. Enter log path – folder accessible from IPMV machine.
- Dump: for TS sources, will dump parts of TS around the error. Enter dump path – folder accessible from IPMV machine. Dump length is configured by “Preroll” field in “Alarms – servers configuration” tab. Cooldown:
- Sql: will log errors in MS SQL database – enter database access info. The output requires IPMV Enterprise license.
- Speech: will read out error messages using Windows text-to-speech module. System default sound card will be used.
- API: to be used with Monitor application and general web API. For Monitor application enter “monitor” in “path component” field. Requires IPMV Enterprise license.
For most outputs you can:
- set interval for alarms repetition
- select active hours
- check if you want the IPMultiviewer to notify that alarm alarm condition has ended
E-mail, SNMP, SQL outputs require configuration under . Click here to find out more.
Don’t forget to connect Condition to Output!
Alarms: change conditions for alarms
Expand condition setup with the “arrow” icon. Adjust settings or choose one of actions available under “Hamburger” icon visible next to arrow when condition is expanded.
Edit name<: Enter friendly name for condition. Confirm with Enter.
Add to selected stations: Select sources in the mosaic editor – using “Multiselect” option or click while holding Ctrl, and then use this action to copy Alarm condition over selected sources.
Delete this condition: removes the condition for source configuration
Alarms: manage conditions list
Click “hamburger” icon next to button and select one of actions:
Delete all conditions: removes all conditions from the station configuration
Filter > Select: filter out conditions, leaving only the conditions of selected type. To clear selection, go to Filter > Reset filter
Reset grouping: when two or more stations are selected, changing the parameter of a single station will break configuration form into separate sections. Choose Reset grouping to combine them back to one form.
Collapse / expand all: triggers the condition view between brief and detailed. Each condition can be expanded and collapsed individually with “arrow” icon in its header.